How to Disable SBCore Service – Disabling sbscrexe.exe Event ID 1001 / 1013 / 1014

A client recently migrated from a SBS 2003 server to a SBS 2011 installation. During the migration – they discovered legacy applications that weren’t meant to run on a x64 platform. They decided to keep the older SBS 2003 server to run these applications after demoting it from a Domain Controller.

They contacted us after a week – informing us that their older SBS 2003 server keeps rebooting. Looking in the logs we noticed a handful of related events – ID 1001/1013/1014. Looking at http://support.microsoft.com/kb/555087 – it explains that they are in violation of the EULA relating to SBS 2003.

They needed to migrate their applications and data over to a new server but couldn’t do so while the system kept rebooting. To allow them to migrate their information, we disabled the C:\WINDOWS\system32\sbscrexe.exe process that was responsible for rebooting the server every 60 minutes.

This was accomplished by:

1) Booting the server into a Linux Live-CD distribution (we used the GParted Live CD found here: http://gparted.sourceforge.net/livecd.php)

2) Mounting the hard drive partition that contains the Windows installation.

3) Browsing to \WINDOWS\system32\ and either renaming or deleting the sbscrexe.exe file.

4) Rebooting the server into Windows and verifying that the sbscrexe.exe process is no longer running in the task manager.

There are numerous posts online that describe editing permissions on the registry and file while in the Windows environment – we found the Live-CD method to be the easiest and safest for resolving this issue. If you are experiencing issues related to the SBCore service and need help – please don’t hesitate in contacting us.

ClearOS Dansguardian accessdenied.php Bypass Script

Using Dansguardian on ClearOS, ClarkConnect, or any basic *unix setup, you can configure a .php script to bypass the content filtering software for a set amount of time using a defined username and password. This walkthrough involves the modification of configuration files and general *unix knowledge. If you need additional assistance please don’t hesitate to contact us via email or phone.


This walkthrough requires a fully configured content filter utilizing Dansguardian or Dansguardian-AV utilizing a transparent proxy!

We need to first log into our server via console or SSH. Once logged in we need to locate the first file to edit called dansguardian.conf

To locate the file, as the location varies, I prefer to use the universal *unix find command-


In the case above, the file is located in the /etc/dansguardian-av/ directory. To edit the file, you can use your favorite *unix text editor. In this case I am going to use nano as it’s fairly easy to use-


There are a few settings that must be configured correctly in this file for later us:

  • Set the reporting level to 1 or 2 depending on your needs
  • Point the accessdenied.php script to a file location in which we’ll create later
  • Enable the non-standard delimiter in order to allow dansguardian to correctly pass information to our script


Please note the in above image the ip-address reflects the location of your transparent proxy server.

Now we need to edit the dansguardianf1.conf file which is located in the same location:


There are additional settings we need to change here:

  • Change the temporary bypass denied page setting to -1 which configures dansguardian to use our script file
  • You must generate a md5 key that will be unique to our script (see link below)
  • Change reporting level to match setting in dansguardian.conf file


Follow this link to generate a MD5 Key: Generate MD5 Key

We now have to create our accessdenied.php script. This file is located in the transparent web-proxy public location. To locate it, we’ll use the find command again:


In the case above we notice the public directory resides in /var/webconfig/. Let’s create our accessdenied file in the public directory:


To access an example .pdf document outlining the accessdenied.php script, please click the link below:


An outline of some key settings are displayed below:


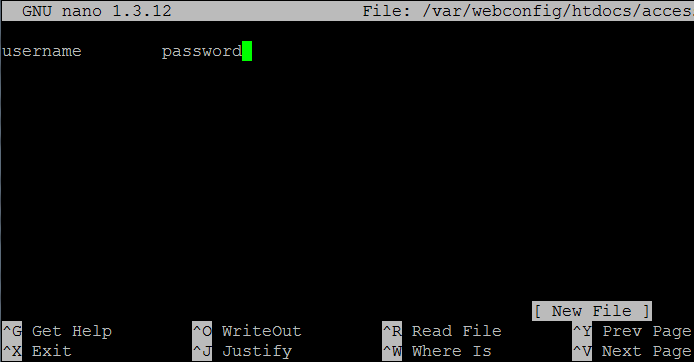
The last step is to create a text file containing a username and password used to bypass the filter. You need to place this file outside of the public www directory used by the transparent-proxy. In the following example I placed the file named access.txt a directory below the public www:

The file can contain a simple username and password separated by use of a tab or space:

Once done, save the file, restart the service, and your should be good to go!

Dell D630/D830 Windows 7 64-bit Touchpad Drivers

Ran into an odd issue after installing SP1 for Windows 7 x64 on a Dell D630, the touchpad / pointing stick stopped responding.

Looking at driver download page for the D630 / D830 (Windows Vista 64-bit) on Dell’s support site shows there are no drivers provided for the touchpad / pointing stick.

I find the lack of updated drivers to be a common problem with Dell’s support site, the solution is usually very simple – look for a similar model system with the correct drivers. In this case the driver page for the D430 provides us with a 64-bit install package for the Dell touchpad / pointing stick.

You can go to Dell’s support site here and download it. Or you can also download it here: