Java Not Installed – Fixed in Chrome

Recently we learned that the newest version of Chrome will no longer support an antiquated Netscape API. Basically this disabled Java applications from running within Chrome. As we’re in the midst of mandated State Pearson testing, this break resulted in significant problems for our students.

According to a recent Google Chromium thread this feature is being deprecated totally in September 2015.

In September 2015, Google will remove the override and NPAPI support will be permanently removed from Chrome. Installed extensions that require NPAPI plugins will no longer be able to load those plugins.

Issue 477112: Latest Java not working with Chrome 42

There is a simple solution, which is to re-enable the NPAPI plugin. That setting can be found below

NPAPI Setting

Enable NPAPI

Fix Blocked Java

Due to recent security issues Java has changed the way their web plugin functions. However many websites required older, different versions of Java and therefore it is essential to allow these older versions to still run. Below I’ve outlined the steps necessary to allow these older versions access.

First, you must open your Java Control Panel.

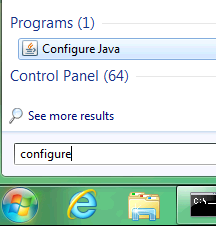
Click on the Start Button and type the following: configure

Then, click on the Configure Java shortcut as displayed below.

ConfigureJava

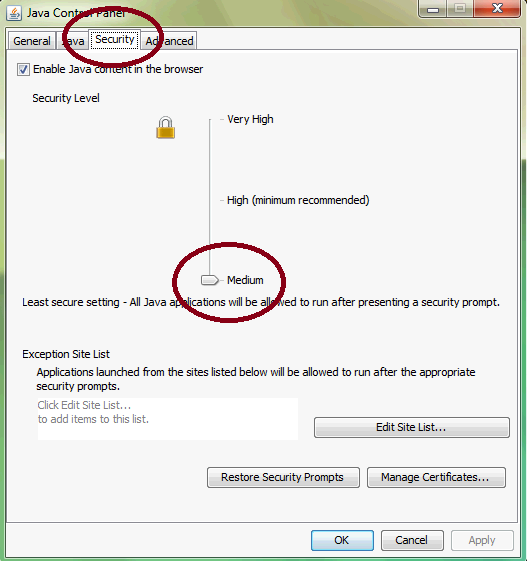
From this Control Panel you will need to make a change to the Security tab as depicted. Lower the security level to medium. This will allow all java applications to run after the display of a security prompt to confirm.

ConfigureJava2

EFF HTTPS Everywhere

Honest PC Help doesn’t advocate for any particular product or vendor but we do maintain a concern for our customers privacy and security. The Electronic Frontier Foundation, a leading organization in keeping the Internet free, has released a few custom browser plugins that force the use of HTTPS when possible. HTTPS creates a secure connection over an insecure network, in this case, the Internet. By forcing your browser to use HTTPS when available you are ensuring that your private information is protected from snooping and other intrusive behavior.

The HTTPS Everywhere plugin provided by the EFF is a great tool that any web savvy user should have installed. The download and installation information can be found below. They’ve also recently released a plugin for Firefox on Android. We hope you find this tool useful and please provide any feedback you feel is necessary. Safe browsing.

https-everywhere2

Secure your WordPress Installation

There are many plugins that can be used to enhance the security of your WordPress website. Additionally you can add some code to your local .htaccess file that will work in conjunction with plugins to really harden your installation against attacks. Below I’ve outlined some specific plugins I have found useful as well as some instructions that can be used to secure your installation.

Ultimate Security Checker by Eugene Pyvovarov is a security plugin that performs simple checks on your WordPress installation and can be used to highlight missed aspects of your installation.

WP Security Scan by WebsiteDefender is another useful WordPress security tool that will give your website a rating dependent on how secure it is.

Better WP Security by Bit51.com is a tool that will automatically ‘harden’ your website against basic WordPress attacks. Be careful with this one as you can harden your website so securely that you may be unable to get back in!

In order to modify your .htaccess file merely FTP into your website and modify the .htaccess file with a text-editor of your choice. I prefer to use WinSCP for FTP as it has a built-in file editor. If you’d like to use WinSCP, you can download it from here.

Once you’ve logged into your FTP modify the .htaccess file located at the root of your installation.

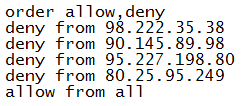
In order to block specific IP addresses from accessing your WordPress site, merely add the following code to the .htaccess file replacing the IP’s I have listed with the ones you’d like to block.

order allow.deny htaccess

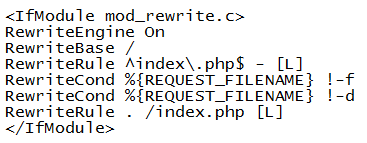
Additionally you can add the following code to harden your WordPress install against the use of malicious code that can be injected into your site.

mod_rewrite.c code

Once you’ve added the code listed above merely save the .htaccess file and you should be good to go. I’ve also included a link at the end of this post with good information on other methods you can use to secure your installation.

Hardening WordPress Installation
Courtesy of wordpress.org

Google Docs / Drive Firewall Settings

As Jefferson County Schools in Colorado have switched to Google Applications many local schools have some issues with accessing the various Google Applications from behind their firewall or from their location. Google released a document that outlines the various network changes that are necessary in order to allow Google Applications to work at your location.

Google Drive and Sites were designed to work on uninhibited networks. However, for domain and network administrators with specific firewalls and/or servers, the following sites must be accessible for Google Drive and Sites to function properly:

For the following, [N] means any single decimal digit. * means any string not containing a period.

Documents List, Documents, Presentations, and Drawings
http (port 80) connection to docs.google.com, docs[N].google.com and *.docs.google.com.
https (port 443) connection to docs.google.com and docs[N].google.com.
https (port 443) connection to *.docs.google.com.

Spreadsheets
http (port 80) connection to spreadsheet.google.com, spreadsheets.google.com, spreadsheets[N].google.com, and *.spreadsheets.google.com.
https (port 443) connection to spreadsheet.google.com, spreadsheets.google.com and spreadsheets[N].google.com.

Sites
http (port 80) connection to sites.google.com.
https (port 443) connection to sites.google.com.
https (port 443) connection to *.sites.google.com.

All Google Drive products
https (port 443) connection to ssl.gstatic.com.
https (port 443) connection to www.google.com.
https (port 443) connection to *.googleusercontent.com.
https (port 443) connection to gg.google.com.
https (port 443) connection to *.googleapis.com.

The IP addresses that the various domain names resolve to cannot be assumed to fall inside any given address range. IP addresses used by Google Drive may be used by other Google properties. The techniques that Google Drive uses to connect to Google servers depend on the browser, browser version, and networking conditions, among other things. Even if activity to some of the addresses above is not observed in a particular Google Drive product, that doesn’t mean it never will be.


This information was obtained by visiting
http://support.google.com/docs/bin/answer.py?hl=en&answer=1211661

Netflix N8210 Error Fixed!

We’ve been having issues at my school since I’ve updated my content filter to the newer version of ClearOS.  I kept receiving a Netflix error N8210 when attempting to ‘Instantly Watch’ a video from their collection.

ClearOS uses a form of Squid for the transparent proxy on top of Dansguardian-AV.  The solution below should essentially work for anyone that is using a content filter.  The fix is to add these specific domains to your content filter exclusion list.

I located these files after using grep on the dansguardian access.log file to track which servers Netflix was attempting to access during a ‘Instant Stream’ session.  These are:

netflix.com
netflix.net
nflximg.com
nlfxext.com
llwnd.net
edgesuite.com
edgesuite.net

Alternative DNS Servers

Public DNS servers can speed up your web surfing on the internet.  If you’ve had trouble streaming HD YouTube videos or you’re sick of getting redirected when you mistype an address then you might want to switch to a public DNS server.

Most DNS servers are automatically assigned depending upon your ISP.  For most people, the DNS servers assigned automatically will work well enough.  If you’d like to experiment with load times and just see if you can increase performance of your web browsing, changing your DNS server can be a great start.

Google has created a walk-through that will help you configure your network settings to use their public DNS servers, which are listed below.  The walkthrough can also be used for any of the other DNS servers listed below.  The walk-through covers making changes in Windows, Mac OS X, and the Linux environment.

The PDF walk-through can be found here:
Using Google Public DNS

The direct PDF download of the walk-through can be found here:

Google Public DNS Servers
8.8.8.8
8.8.4.4

Level 3 DNS Servers
4.2.2.1
4.2.2.2

OpenDNS Servers
208.67.222.222
208.67.220.220