Sometimes it can be useful to downgrade the BIOS of a device. We’ve found that by downgrading the BIOS on laptops we can change the unlock code used to bypass BIOS lock codes. Most of the schools we work with receive donated equipment so being able to unlock the BIOS becomes imperative, especially during the imaging process. We’ve outlined the steps below to both downgrade the BIOS on an older Dell laptop, as well as include instructions as to unlocking a previously secured BIOS.
Step 1 – Create a Bootable Flash Drive
This process details creating a bootable USB flash drive that includes Hiren’s BootCD. If you’re unfamiliar with Hiren’s it is a great compilation of many tech tools that can be useful for diagnosing and fixing computers. Best of all it’s free, like much of the software we recommend. You’ll need the latest version of the software so you can download that here:
Once you have a copy of the .iso for Hiren’s you’ll need to follow and download a few more tools before you can boot from a flash device. As those steps have been carefully documented already, please follow this link to complete the process of creating a bootable Hiren’s flash drive:
Step 2 – Locate and load a compatible BIOS firmware
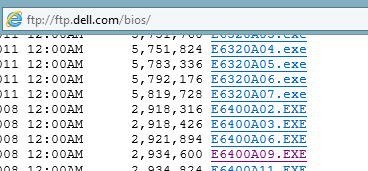
As we’re downgrading the BIOS version on a laptop it can sometimes be challenging to locate old firmware. Luckily for us Dell has their FTP publically accessible hence we can access almost any previous version of BIOS that we’ll need for the next step. Please browse to the following website in a FTP-compatible browser in order to locate the appropriate firmware. In my example I have connected to the website, entered the bios folder, and scrolled to located my specific BIOS version. Sometimes you may have to try a few versions before locating a correct one.

Once you’ve located a version and have downloaded it load the executable (.exe) onto the Hiren’s boot flash you previously created.
Step 3 – Boot and Flash
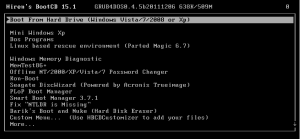
At this point you should have both a Hiren’s boot usb and a copy of a downgraded BIOS you intend to flash your device with. Reboot your Dell and press F12 to access the boot menu. Select the USB device you created and load Hiren’s. You’re prompted to select which Hiren’s tool you’d like to use and for this tutorial we’ll be using Mini Windows XP.

Once Mini Windows XP has loaded on your device, you must select the command prompt from the desktop to access the shell. At the command prompt shell you should type c: to access the flash device. If needed, you can also perform a dir to view all files on the flash device. Locate the Dell BIOS firmware you intend to flash and type it with the following /forceit flag:
At this point the BIOS upgrade launcher should load and it will inform you that BIOS downgrades are not recommended. Agree past all of the update screens and although the launcher states it will automatically reboot you will manually have to type exit to exit the shell and click the start menu to reboot the computer. Once rebooted the Dell BIOS update screen should appear and your BIOS should be downgraded. Be sure not to disconnect power or touch the device during the BIOS update for risk of ‘bricking’ the laptop.
Step 4 – Unlock the BIOS
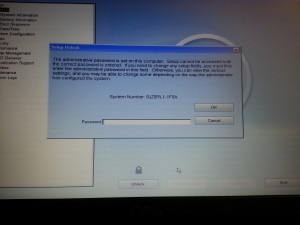
At this final step you should have successfully downgraded your BIOS version in order to change the BIOS unlock code. Once you enter the BIOS and select the Unlock option you’ll be presented with a similar screen:

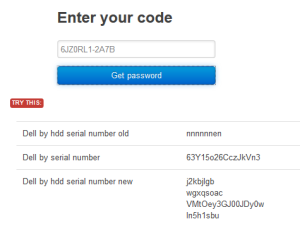
If your system number still contains a [1D3B, 1F5A, 3A5B, or 1F66] then you will need to downgrade to a different BIOS version before you will be able to unlock the device. If your system number ends in a different alphanumeric key then you can continue. For this step you can download the offline tool and keep a local copy or use the following BIOS Master Password Generator website. Please make sure to type your system number all in CAPS and include the exact spelling with hyphens. An example of a successfully generated key can be found here:

As you can see a long password is generated (dell by serial number) which should be entered to unlock the BIOS of your Dell laptop. Please make sure to enter the password exactly as listed paying close attention to the difference between a letter l and the number 1.
The BIOS Password unlocker website and downloadable tool can be found below. As always, if you have trouble with these steps please don’t hesitate to contact us for support. Good luck and get cracking!
BIOS Master Password Generator for Laptops
