Java Not Installed – Fixed in Chrome

Recently we learned that the newest version of Chrome will no longer support an antiquated Netscape API. Basically this disabled Java applications from running within Chrome. As we’re in the midst of mandated State Pearson testing, this break resulted in significant problems for our students.

According to a recent Google Chromium thread this feature is being deprecated totally in September 2015.

In September 2015, Google will remove the override and NPAPI support will be permanently removed from Chrome. Installed extensions that require NPAPI plugins will no longer be able to load those plugins.

Issue 477112: Latest Java not working with Chrome 42

There is a simple solution, which is to re-enable the NPAPI plugin. That setting can be found below

NPAPI Setting

Enable NPAPI

Downgrade/Unlock Dell Laptop BIOS (e6400/d630 series)

Sometimes it can be useful to downgrade the BIOS of a device. We’ve found that by downgrading the BIOS on laptops we can change the unlock code used to bypass BIOS lock codes. Most of the schools we work with receive donated equipment so being able to unlock the BIOS becomes imperative, especially during the imaging process. We’ve outlined the steps below to both downgrade the BIOS on an older Dell laptop, as well as include instructions as to unlocking a previously secured BIOS.


Step 1 – Create a Bootable Flash Drive


This process details creating a bootable USB flash drive that includes Hiren’s BootCD. If you’re unfamiliar with Hiren’s it is a great compilation of many tech tools that can be useful for diagnosing and fixing computers. Best of all it’s free, like much of the software we recommend. You’ll need the latest version of the software so you can download that here:

Download the latest Hiren’s BootCD

Once you have a copy of the .iso for Hiren’s you’ll need to follow and download a few more tools before you can boot from a flash device. As those steps have been carefully documented already, please follow this link to complete the process of creating a bootable Hiren’s flash drive:

How to create a bootable Hiren’s flash drive


Step 2 – Locate and load a compatible BIOS firmware


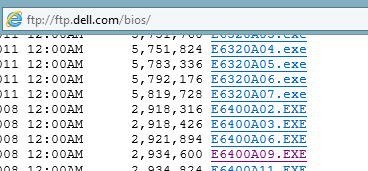
As we’re downgrading the BIOS version on a laptop it can sometimes be challenging to locate old firmware. Luckily for us Dell has their FTP publically accessible hence we can access almost any previous version of BIOS that we’ll need for the next step. Please browse to the following website in a FTP-compatible browser in order to locate the appropriate firmware. In my example I have connected to the website, entered the bios folder, and scrolled to located my specific BIOS version. Sometimes you may have to try a few versions before locating a correct one.


Dell Public FTP Repository

Once you’ve located a version and have downloaded it load the executable (.exe) onto the Hiren’s boot flash you previously created.


Step 3 – Boot and Flash


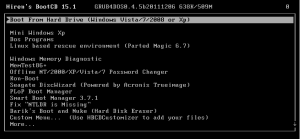
At this point you should have both a Hiren’s boot usb and a copy of a downgraded BIOS you intend to flash your device with. Reboot your Dell and press F12 to access the boot menu. Select the USB device you created and load Hiren’s. You’re prompted to select which Hiren’s tool you’d like to use and for this tutorial we’ll be using Mini Windows XP.


Once Mini Windows XP has loaded on your device, you must select the command prompt from the desktop to access the shell. At the command prompt shell you should type c: to access the flash device. If needed, you can also perform a dir to view all files on the flash device. Locate the Dell BIOS firmware you intend to flash and type it with the following /forceit flag:

e6400

At this point the BIOS upgrade launcher should load and it will inform you that BIOS downgrades are not recommended. Agree past all of the update screens and although the launcher states it will automatically reboot you will manually have to type exit to exit the shell and click the start menu to reboot the computer. Once rebooted the Dell BIOS update screen should appear and your BIOS should be downgraded. Be sure not to disconnect power or touch the device during the BIOS update for risk of ‘bricking’ the laptop.


Step 4 – Unlock the BIOS


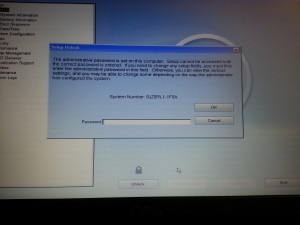
At this final step you should have successfully downgraded your BIOS version in order to change the BIOS unlock code. Once you enter the BIOS and select the Unlock option you’ll be presented with a similar screen:

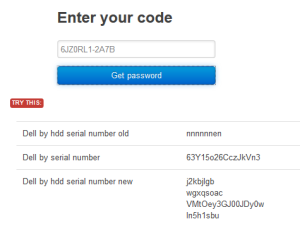
If your system number still contains a [1D3B, 1F5A, 3A5B, or 1F66] then you will need to downgrade to a different BIOS version before you will be able to unlock the device. If your system number ends in a different alphanumeric key then you can continue. For this step you can download the offline tool and keep a local copy or use the following BIOS Master Password Generator website. Please make sure to type your system number all in CAPS and include the exact spelling with hyphens. An example of a successfully generated key can be found here:

As you can see a long password is generated (dell by serial number) which should be entered to unlock the BIOS of your Dell laptop. Please make sure to enter the password exactly as listed paying close attention to the difference between a letter l and the number 1.

The BIOS Password unlocker website and downloadable tool can be found below. As always, if you have trouble with these steps please don’t hesitate to contact us for support. Good luck and get cracking!


BIOS Master Password Generator for Laptops

Dell Master BIOS Decompiler

ClearOS 6.x Filter Bypass Script

A very special thanks to our friends at ClearOS for working with us to customize a dansguardian bypass page for their latest version of ClearOS. Please follow the link below for instructions on customizing your ClearOS content-filter in order to add a username/password bypass that staff can use to bypass the filter.

It’s a great feature to enable in educational settings as it allows for CIPA compliance, yet flexibility for staff when encountering restricted websites. If you encounter any problems on setup please contact us so we can assist with your specific setup. Take care!

ClearOS 6.x Filter Block Page Override Instruction

Fix Blocked Java

Due to recent security issues Java has changed the way their web plugin functions. However many websites required older, different versions of Java and therefore it is essential to allow these older versions to still run. Below I’ve outlined the steps necessary to allow these older versions access.

First, you must open your Java Control Panel.

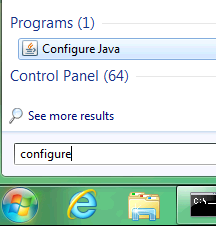
Click on the Start Button and type the following: configure

Then, click on the Configure Java shortcut as displayed below.

ConfigureJava

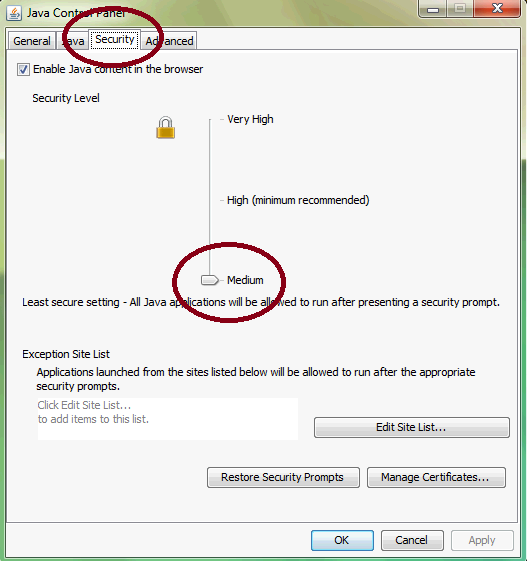
From this Control Panel you will need to make a change to the Security tab as depicted. Lower the security level to medium. This will allow all java applications to run after the display of a security prompt to confirm.

ConfigureJava2

Embedding from Google Drive

A lot of the work we do for clients tends to be online and I find myself using Google Drive more and more. Not only to share files and documents client information but also as a fileshare. Google recently dropped their online storage costs significantly so it’s a great service to consider if you need online storage space.

Today’s trick is a simple bit of code that can be used to embed files located in your Google drive. The first step you will need to accomplish is to locate the actual fileID of your Google Doc. Open whatever file you’re wishing to embed and notice the fileID located in the URL in your address bar.

URL FileID

Make sure you copy that address as we’ll use in with our next bit of code. Copy the following code and replace [put your file id here] with the actual fileID you located in our previous step.

Embed Code

Just click the above image to zoom in on the code, or copy and paste from the code listed below.

<iframe src=”https://docs.google.com/viewer?srcid=[put your file id here]&pid=explorer&efh=false&a=v&chrome=false&embedded=true” width=”640px” height=”480px”></iframe>

You can easily adjust the size of the embed window via the above code, just adjust either the width or height values. Additionally, the code removes the standard left-navigation bar making a clean embed very simple. As always please contact us with any questions or comments and thanks for visiting!

EFF HTTPS Everywhere

Honest PC Help doesn’t advocate for any particular product or vendor but we do maintain a concern for our customers privacy and security. The Electronic Frontier Foundation, a leading organization in keeping the Internet free, has released a few custom browser plugins that force the use of HTTPS when possible. HTTPS creates a secure connection over an insecure network, in this case, the Internet. By forcing your browser to use HTTPS when available you are ensuring that your private information is protected from snooping and other intrusive behavior.

The HTTPS Everywhere plugin provided by the EFF is a great tool that any web savvy user should have installed. The download and installation information can be found below. They’ve also recently released a plugin for Firefox on Android. We hope you find this tool useful and please provide any feedback you feel is necessary. Safe browsing.

https-everywhere2

Windows Desktop – Sound Fix

Just recently I encountered a very random, seemingly odd issue related to sound and a Windows 7 desktop. I initially tested the speakers to ensure they worked and then I took a look at the desktop. The soundcard didn’t seem to be bad, neither was the integrated audio but I still couldn’t get the machine to play sound. After searching around on the Internet for awhile I encountered an easy fix that was mentioned a few times on various sites. The original article can be found here (http://www.pcgamer.com/2011/11/10/the-most-frustrating-windows-7-audio-problem-solved/)

Please note that the following process will lower the security of your PC. For corporate customers this isn’t such a big deal but for personal users you want to ensure you have additional forms of security in place before you enabled these settings.

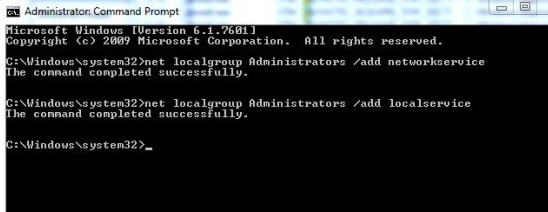
At a secure command prompt please type the following commands.

audio commands

If you ever want to revert the changes then just run the same commands, swapping delete for the add command to reverse the process.

Secure your WordPress Installation

There are many plugins that can be used to enhance the security of your WordPress website. Additionally you can add some code to your local .htaccess file that will work in conjunction with plugins to really harden your installation against attacks. Below I’ve outlined some specific plugins I have found useful as well as some instructions that can be used to secure your installation.

Ultimate Security Checker by Eugene Pyvovarov is a security plugin that performs simple checks on your WordPress installation and can be used to highlight missed aspects of your installation.

WP Security Scan by WebsiteDefender is another useful WordPress security tool that will give your website a rating dependent on how secure it is.

Better WP Security by Bit51.com is a tool that will automatically ‘harden’ your website against basic WordPress attacks. Be careful with this one as you can harden your website so securely that you may be unable to get back in!

In order to modify your .htaccess file merely FTP into your website and modify the .htaccess file with a text-editor of your choice. I prefer to use WinSCP for FTP as it has a built-in file editor. If you’d like to use WinSCP, you can download it from here.

Once you’ve logged into your FTP modify the .htaccess file located at the root of your installation.

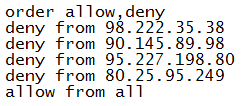
In order to block specific IP addresses from accessing your WordPress site, merely add the following code to the .htaccess file replacing the IP’s I have listed with the ones you’d like to block.

order allow.deny htaccess

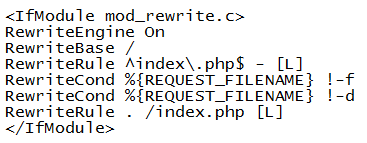
Additionally you can add the following code to harden your WordPress install against the use of malicious code that can be injected into your site.

mod_rewrite.c code

Once you’ve added the code listed above merely save the .htaccess file and you should be good to go. I’ve also included a link at the end of this post with good information on other methods you can use to secure your installation.

Hardening WordPress Installation
Courtesy of wordpress.org

Google Docs / Drive Firewall Settings

As Jefferson County Schools in Colorado have switched to Google Applications many local schools have some issues with accessing the various Google Applications from behind their firewall or from their location. Google released a document that outlines the various network changes that are necessary in order to allow Google Applications to work at your location.

Google Drive and Sites were designed to work on uninhibited networks. However, for domain and network administrators with specific firewalls and/or servers, the following sites must be accessible for Google Drive and Sites to function properly:

For the following, [N] means any single decimal digit. * means any string not containing a period.

Documents List, Documents, Presentations, and Drawings
http (port 80) connection to docs.google.com, docs[N].google.com and *.docs.google.com.
https (port 443) connection to docs.google.com and docs[N].google.com.
https (port 443) connection to *.docs.google.com.

Spreadsheets
http (port 80) connection to spreadsheet.google.com, spreadsheets.google.com, spreadsheets[N].google.com, and *.spreadsheets.google.com.
https (port 443) connection to spreadsheet.google.com, spreadsheets.google.com and spreadsheets[N].google.com.

Sites
http (port 80) connection to sites.google.com.
https (port 443) connection to sites.google.com.
https (port 443) connection to *.sites.google.com.

All Google Drive products
https (port 443) connection to ssl.gstatic.com.
https (port 443) connection to www.google.com.
https (port 443) connection to *.googleusercontent.com.
https (port 443) connection to gg.google.com.
https (port 443) connection to *.googleapis.com.

The IP addresses that the various domain names resolve to cannot be assumed to fall inside any given address range. IP addresses used by Google Drive may be used by other Google properties. The techniques that Google Drive uses to connect to Google servers depend on the browser, browser version, and networking conditions, among other things. Even if activity to some of the addresses above is not observed in a particular Google Drive product, that doesn’t mean it never will be.


This information was obtained by visiting
http://support.google.com/docs/bin/answer.py?hl=en&answer=1211661

Windows 7 Print Spooler Error Fix

The guide below demonstrates a simple fix for common Windows 7 print spool errors. If the print spooler error persists after troubleshooting there may be additional corruption within your OS or printer driver subsystem. As always, make sure you are using the most updated drivers available from your manufacturers website.


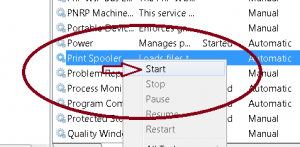
1] To begin, open up services.msc and STOP the print spooler service

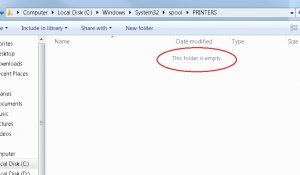
2] Browse to c:\windows\system32\spool\PRINTERS using Windows Explorer
(If prompted by UAC click yes to approve opening the PRINTERS folder)

3] Delete ALL of the files located in the PRINTERS folder and then you can close Windows Explorer.

WARNING – Do NOT delete the PRINTERS folder itself

4] To finish, re-open services.msc and START the print spooler service